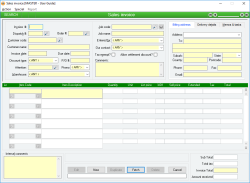
Sales invoice
A Sales invoice is the means by which you charge a customer for goods or services they have received through a Dispatch, or for goods or services they have returned through a Dispatch return. A Sales invoice can also be used to charge for Non stock items that are not related to a specific Dispatch for a Customer, or to give credits that are not related to a specific Dispatch return.
A Sales invoice that is not generated for a Dispatch or a Dispatch return can only contain non-stock items: it cannot perform any Stock transactions for stock items. To perform stock transactions on a customer invoice, you must use the POS Receipt facility. POS Invoices can be managed through the same interface and regular Sales invoices, but will show the word P.O.S. at the top left of the form.
A Sales invoice can only be created for a single Dispatch or Dispatch return, but a Dispatch or Dispatch return may have multiple Sales Invoices relating to them.
A Sales invoice is referenced throughout the system by its Sales Invoice #.
When a normal Sales invoice is created, you must select either a Dispatch # (or a Dispatch Return #) or leave the Dispatch # field empty and just select a Customer manually. If you have not selected a Dispatch, you can only add non-stock items to the invoice lines. If you have selected a Dispatch, you can add non-stock items to the invoice lines as well as adjust any of the quantities of lines that are automatically filled in from the Dispatch.
When a POS Invoice is created, you can add any Items you like to the invoice lines. When the form is updated, the items will be removed from stock and the costs will be debited from the items' Cost of Sales accounts.
You cannot delete a Sales invoice or POS Invoice that has been fully or partially paid (that is, if it is referenced in the Receipt lines of a Receipt form). You cannot edit a Sales invoice or POS invoice if it has been receipted AND the receipt has been deposited.
A Sales invoice line consists of automatic lines (those that come directly from the Dispatch or Dispatch return if one exists) and / or manual lines (a manually-entered item code, quantity and price information). A POS Invoice consists only of manually-entered lines.
Both Sales Invoices and POS Invoices are referenced throughout the system by a unique Invoice number.
- If the amount of all of the lines is zero, you will be asked if this is correct. This checks that you haven’t inadvertently updated the invoice without filling in any quantities. If you select No, then you will be returned to edit mode and no action will be taken
- If the customer is on stop-credit or is over their credit limit or will exceed their credit limit if this invoice is processed, you will be warned of this and asked if you want to continue. If you select No, then you will be returned to edit mode and no further action will be taken. If you select Yes, then the update will continue if you have Administrator permissions for Sales Invoices, otherwise you will be prompted to enter an Administrator user code and password before you can continue
- If the Sales invoice date is prior to the date of the related dispatch (if one exists), you will be warned of this and asked if you want to continue
- For each line in the Sales invoice a Journal transaction is created that Debits the customer’s account (increases its value) and Credits the Income account specified in the Sales invoice line details (decreases its value) by the total ex-tax amount of the line
- For each line in the Sales invoice a Journal transaction is created that Debits the customer’s account (increases its value) and Credits the Tax on Sales account (decreases its value) specified for the Tax code relating to the item being invoiced by the total tax amount of the line
- If the amount of all of the lines is zero, you will be asked if this is correct. This checks that you haven’t inadvertently updated the invoice without filling in any quantities. If you select No, then you will be returned to edit mode and no action will be taken
- If the customer is on stop-credit or is over their credit limit or will exceed their credit limit if this invoice is processed, you will be warned of this and asked if you want to continue. If you select No, then you will be returned to edit mode and no further action will be taken. If you select Yes, then the update will continue if you have Administrator permissions for Sales Invoices, otherwise you will be prompted to enter an Administrator user code and password before you can continue
- For each line in the POS Invoice a Journal transaction is created that Debits customer’s account (increases its value) and Credits the Income account specified in the Sales invoice line details (decreases its value) by the total ex-tax amount of the line
- For each line in the POS Invoice a Journal transaction is created that Debits the customer’s account (increases its value) and Credits the Tax on Sales account (decreases its value) specified for the Tax code relating to the item being invoiced by the total tax amount of the line
- For each stock item in the POS Invoice a POS Dispatch item transaction is created that removes the quantity of items from stock and adds their value to the respective Cost of Sales accounts. A corresponding journal transaction is created for each such item transaction
- A warning is issued if an update is attempted on a Sales invoice whose Customer is on stop-credit or is over their credit-limit. Only a user with administrative permissions will be able to update such an invoice
- A warning is issued if an update is attempted on a Sales invoice containing any items that are being sold at less than the current average cost + X%, where X is the specified Minimum markup threshold
- A warning is issued if an update is attempted on a Sales invoice whose Invoice date is prior to a related Dispatch date.
- You can manually change the default Discount type used for price calculations on the Sales invoice
- Pop up notifications available for Customers and Items
Module: Accounts receivable
Category: Sales invoice
Activation: Main > Accounts receivable > Sales invoice
Form style: Multiple instance, WYSIWYS, SODA
Special actions available for users with Administrator permissions:
- Alter the User ID in the Entered by field.
- Edit the following restricted fields:
- Bypass and override Credit limit and Stop-credit checks.
- Bypass Minimum sales quantity checks for items.
- Update invoices where the Sell price is less than the current Current Cost / Quantity Summary for the selected Warehouse.
- Update invoices with no lines assigned.
- Update invoices where the Totals exceeds the total # of lines Dispatched/Totals, or where the Totals exceeds the Totals.
- Alter the Invoice # when System preference Allow Sales invoice administrators to manually override sales invoice numbers for new invoices has been selected.
- Change the User ID of the Entered by field of memos.
- Edit memos entered by other users.
Database rules:
- A sales invoice or POS Receipt cannot be modified or removed if it either after the Extended financial year or in the current financial year, but prior to the Journal lock date or relevant account lock dates
- A sales invoice can be given a date prior to the current financial year, but the Supplier invoice will not update account totals
- A sales invoice for a date prior to the current financial year can be deleted, but doing so will not update account totals
- A Sales invoice or POS Invoice cannot be given a date that is outside the range of the Extended financial year
- A Sales invoice or POS Invoice cannot be deleted if it is referenced by any of the following:
- Receipt
Reference: Number, Read-only, WYSIWYS
This number uniquely identifies a Sales invoice. The Invoice # is automatically generated by the system after the first update of the invoice and cannot be changed for the life of the invoice.
If a Sales invoice is deleted, its Invoice # will never be used again for another Sales invoice.
Reference: Button
This field indicates whether the current Sales invoice has been fully or partly receipted. It will only be visible for sales invoices that have at least one receipt entered for them.
Clicking on the field will cause a menu to drop-down displaying all the receipts relating to the current sales invoice. Clicking on any of the displayed receipts will then display the selected receipt record.
Reference: Number, QuickList, WYSIWYS
This is the (optional) Dispatch # or Return # for which the Sales invoice is being performed. If a Dispatch number has been selected, then when you leave the field the Customer code and Order # are filled in and all available lines for the selected Dispatch (those that have not been fully invoiced) are displayed in the Invoice lines area. To display a list of all valid Dispatch numbers, click on the button or press the QuickList Hot Key.
If the Customer selected is on stop-credit or is over their credit-limit you will be warned of this when you leave the field.
The Dispatch number does not have to be filled in. To manually create a Sales invoice for a customer, leave the dispatch number empty and type in the customer’s code in the Customer code field instead.
Once a Sales invoice has been created for a Dispatch or a customer, the Dispatch number cannot be changed in subsequent edits of the invoice.
Reference: Number, QuickList, WYSIWYS
This is the Order number that relates to the selected Dispatch or Dispatch return. If this is a manual invoice (no Dispatch or Dispatch return entered), then the Order # will be empty.
Reference: Text(12), Mandatory, AutoComplete, QuickList, WYSIWYS
This is the Customer code that represents the Customer (Debtor) for whom the Sales invoice is being created. This field is an auto-complete field and must contain a valid Customer code before you can update the invoice. To display a list of all valid Customer Codes, click on the button or press the QuickList Hot Key.
If the Customer selected is on stop-credit or is over their credit-limit you will be warned of this when you leave the field.
If you have selected a Dispatch number for this invoice, you will not be able to change the Customer code. Conversely, you can only manually type in the Customer code if the Dispatch # field is left empty.
Once a Sales invoice has been created for a Dispatch or a Customer, the Dispatch number cannot be changed in subsequent edits of the invoice.
This is the name of the Customer that relates to the Sales invoice and can only be changed by either selecting a different customer on the Sales order before any Dispatch, Dispatch return or Invoices have been created for the order, or by selecting a different Customer code on the invoice.
Reference: Date, Mandatory, QuickList, WYSIWYS
This is the date on which the Sales invoice is created. It can be any valid date that is within the current extended Financial year providing the date is not before the Journal lock date.
The date entered here directly affects which accounting period will be updated with the income from the invoice.
Reference: Date, Mandatory, QuickList, WYSIWYS
This is the date by which the Sales invoice should be fully paid. When a Dispatch or Customer is entered, or the Invoice date modified, this field will be updated automatically based on the terms of the customer.
While this date is only used as a reference, it can be used in the reporting system to generate reports based on Sales invoice due dates.
Reference: Select from list, Mandatory, HotEdit, WYSIWYS
This is the Discount type that will be used in price calculations for items entered on the Sales invoice or POS Invoice. For Sales invoices based on a Dispatch, the discount type will be automatically set to the discount type used for the dispatch and will not be able to be changed. If no dispatch has been specified, the discount type will initially default to the Discount type for the Customer you have selected, but you may be able to change it to another discount type based on permissions and the value of the 'Allow non-admin users to manually override customer line prices ' option in the database setup.
If the Discount type is changed while you already have invoice lines entered, you will be asked whether or not you want all of the prices for those items changed in accordance with the new Customer code / Discount type combination.
Reference: Text(64), QuickList, WYSIWYS
This is the Customer’s sales representative for the Sales invoice. When a Customer is entered on to a Sales form, the contact selected for the Attention field is chosen alphabetically by the contact Role field followed by the Surname/Firstname. If you type a contact name in to this field and, on update, it matches one of the contacts listed for the customer, then this field will be linked to the contact and allow a hyperlink to the contact record (indicated by a blue underline on the field when in IDLE mode on the form).
You may click on the search button next to the Attention field to search for a contact.
Last edit: 26/05/20
Reference: Select from list, HotEdit, WYSIWYS
Information is under review for a new version and will be updated soon.
Reference: Select from list, Mandatory, HotEdit, WYSIWYS
This is the warehouse from which any invoiced Items will be removed if necessary for the Sales invoice.
For a normal Sales invoice where a Dispatch has been specified, the Warehouse field is set to that of the Sales order and cannot be changed.
For a normal Sales invoice where a Dispatch has not been specified, the Warehouse represents the warehouse from which the (non-stock) Items are being taken.
For a POS Receipt, any item can be entered and this is the warehouse from which those Items will be POS-Dispatched when the invoice is updated.
Reference: Select from list
This is the Tax codes for the Sales invoice. This field will pre-fill with the selected Customer's tax code if one has been set, but can be changed as needed.
By default, lines on Sales quotes, orders, and invoices will use the tax code that has been allocated to the Item. Specifying a tax code using this field will pre-fill the tax code for each new line, and will override the tax code set for any existing line on that record. However, tax codes for each line can still be altered and can differ from the record-specific tax code if desired.
You may choose to use this for organisations that have region-based tax regimes (e.g. United States), and need a tax code / jurisdiction to default per customer. You would also use this for customers who are always tax exempt, or need to be set to a special tax code for any other reason. You can use keyboard shortcut F12 to manage this field.
If you don't need to use this for any specific reason, it's best to leave it empty and let the system enter the default values. Incorrect use can cause undesired effects, so only use it if you are sure you understand what its effects will be.
This field will only appear when Allow tax codes to be set on Customers and Sales records has been set in system preferences.
Last edit 26/02/24
Reference: Text(64), AutoComplete, QuickList, WYSIWYS
This is the Job to which this line of the Sales invoice belongs. This field does not have to be filled in, but if it is it must represent a valid Job.
Only manual Sales invoice lines can have their job modified. Jobs for lines from a Sales order / Dispatch, can only be modified at the Sales order stage, not the Invoice stage.
To display a list of all valid Jobs, click on the button or press the QuickList Hot Key.
Reference: Select from list, Mandatory, HotEdit, WYSIWYS
This is the User ID of the user that created the Sales invoice. This is automatically filled with the User ID of the current user and cannot be changed unless the user has Administrator permissions for Sales Invoices.
Reference: Select from list, Mandatory, HotEdit, WYSIWYS
Information is under review for a new version and will be updated soon.
Reference: Yes/no
This is a flag indicating whether the Sales invoice line prices should be calculated with or without tax. If a Sales invoice is tax exempt, no tax is calculated on any of the invoice lines. This field is initially set based on the TAX exempt flag of the Sales order from which the invoice is derived (if one exists) or the Customer types to which the Customer belongs, but can be modified afterwards.
Reference: Yes/no
This is a flag indicating whether settlement discounts should be considered for the Sales invoice. If settlement discounts are allowed for a Sales invoice, the Settlement discount values checks will be performed at the Receipt stage.
This field is only available if the 'Support customer settlement discounts ' option in the Preferences is selected and if so, will initially be set based on the Settlement discount fields of the Customer for which the invoice has been entered.
Reference: Memo, Expandable, WYSIWYS
These are any comments or instructions that will appear on the printouts for the Sales invoice.
The comments entered here are initially transferred from the Comments field from the Dispatch or Dispatch return if one exists.
Reference: Memo, Expandable
These are any internal comments or instructions that are not intended to appear on printed material for external consumption, for internal eyes only.
Reference: Currency, Read-only
The totals that appear at the bottom of a Sales order are described as follows:
- Sub Total
- The total of the Sales invoice not including tax
- Tax
- The total tax of all the Sales invoice lines.
- Total
- The total amount payable by the Customer, including tax
- Amount received
- The total of all amounts that have been received by the customer for this Sales invoice
Any or all of the invoice amounts may be negative.
Reference: Read-only
A label may be displayed at the bottom of the Sales invoice. Their meaning is outlined below:
| Label name | Meaning |
|---|---|
| Credit | Invoice amount is negative. No paid amount. |
| Credit (Applied) | Invoice amount is negative and equal to paid amount. |
| Credit (Over applied by ###) | Invoice amount is negative and greater than paid amount. |
| Credit (Part Applied. ### remaining) | Invoice amount is negative and lesser than paid amount. |
| Paid | Invoice amount is positive and equal to paid amount. |
| Over paid by ### | Invoice amount is positive and lesser than paid amount. |
| Part paid (### owing) | Invoice amount is positive and greater than paid amount. |
| Awaiting credit request | There is a returned goods entry for the invoice, and one of the lines for that entry has a Returned Goods Reason which has the "credit requested" option ticked. |
| <The label is blank> | Invoice amount is positive with no payments. |
Reference: Select from list
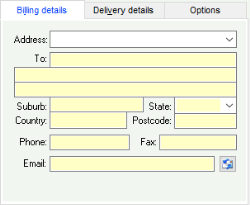
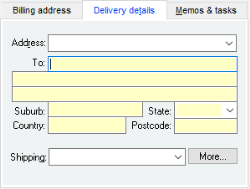
These are the lines of the postal address that will be used for the invoice. The address lines are initially filled from the Sales order to which this invoice relates (if any), but can be modified as necessary.
These are the lines of the postal address that will be used for the invoice. The address lines are initially filled from the Sales order to which this invoice relates (if any), but can be modified as necessary.
Reference: Button
This button prepares an email with the contents of the email field set as the addressee.
Reference: Select from list
Information is under review for a new version and will be updated soon.
Reference: Select from list, HotEdit
Information is under review for a new version and will be updated soon.
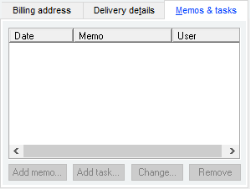
The Sales invoice memo section allows you to enter an unlimited number of memos to record historical events and facts about a Sales invoice.
- To add a new memo, click on Add memo button to display a form that will allow you to enter the date, the user and the memo text
- To edit an existing memo, either click on the Change memo button or double-click on the list entry
- To delete a memo, click on the Remove memo button
- Memos cannot be edited unless the Sales invoice form is in Edit mode
Reference: Text(30), AutoComplete, QuickList, WYSIWYS
This is the item code identifying the item for the invoice line. This must represent a valid Item code, but you can type the first few letters of the code and activate the QuickList (by clicking on the button or pressing the QuickList Hot Key. If you select multiple items from the item QuickList, each item code will be entered in consecutive order lines.
You cannot change an item code for an invoice line that relates to a Sales order (i.e. not a manually entered line). If you manually enter an item code, it must only be a non-stock item.
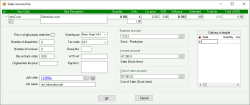
The i button displays Sales invoice line details; that is, more detailed information about the Sales invoice line.
Reference: Text(255), Expandable, WYSIWYS
This is the description for the order line. It is initially filled in with the description of the item code selected and can only be changed if it is a manually entered line.
Reference: ActionForm
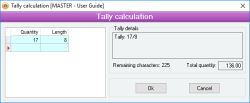
Pressing S while in the Quantity field will open the Tally calculation form.
This form allows you to keep a tally of items that are recorded on a line for Sales order, Sales quotation, Sales invoice and Purchase order.
There is a characters remaining label that keeps track of how many more characters can be added to the description before it will overflow. When you enter too many characters that cause the remaining amount below 0, the label will turn red and the OK button will be disabled. Before the limit reaches 0, you should start a new line.
Longer product descriptions will affect the amount of characters that can be added to the tally form. There is a total character limit of 255, less the number of characters given to the description. Each cell on the tally form has a limit of 15 characters only to prevent an overflow error from occurring when entering too many into a cell.
Last edit 29/01/20
Reference: Select from list
This is the unit of measure of the item that is being invoiced. The Quantity specified is always in terms of this unit, and the number of single items that constitute this unit is displayed below the Unit field (unless that quantity is 1)
To change the Unit of the item, either click the left or right mouse button on the Unit field or press CTRL-U in either the Quantity field or the list price field: this will display a pop-up menu from which you can select a different unit if one exists. Changing the unit for a line will cause the price for the line to be recalculated so that discount structures and volume discounts can be applied.
The units available for selection are those specified in the Units / Pricing field in the Inventory form for the specified item.
If the Invoice line refers to a line from a Dispatch, then the Unit field cannot be changed.
Reference: Quantity
This is the number of single Items that constitute the Unit selected for the line. If this number is 1 (for example, the Unit is each) then it will not be displayed.
Reference: Currency
This is the list or standard price per unit for the item and is filled in by default from the Sales order for the line (if one exists) or the list Price of the item. A discount can be applied to this price to arrive at the Customer’s cost price. The list price cannot be modified unless the invoice line is a manually-entered line and is also based on permissions and the value of the 'Allow non-admin users to manually override customer line prices ' option in the database setup.
Reference: Quantity, Read-only
This is the discount that is taken OFF the list Price to arrive at the Customer’s cost price. This field may be modified based on permissions and the value of the 'Allow non-admin users to manually override customer line prices ' option in the database setup.
Reference: Currency, Read-only
This is the price per unit that the Customer is being charged (not including tax) for the item. Their price can be modified based on permissions and the value of the 'Allow non-admin users to manually override customer line prices ' option in the database setup.
Reference: Currency, Read-only
This is the total Customer’s cost for the line not including tax. It is equal to Quantity x Sell price. This total is rounded to 2 decimal places.
Reference: Button
This button opens the Line details form.
Reference: Yes/no
Information is under review for a new version and will be updated soon.
Reference: Select from list, Mandatory, HotEdit, WYSIWYS
Information is under review for a new version and will be updated soon.
Reference: Select from list, WYSIWYS
This is the Tax code to be used for the Sales invoice Sline. This will pre-fill with the tax code assigned to the Item, but can be changed as desired.
If Allow tax codes to be set on Customers and Sales records has been selected within your Accounts receivable System preferences, this field will instead pre-fill with the Tax code assigned to the record.
Reference: Text(50)
Information is under review for a new version and will be updated soon.
Reference: Text(64), AutoComplete, QuickList
This is the Job to which the line of the Sales invoice relates, if any. A Sales invoice line does not have to have a Job, but if the Sales invoice is linked to a Dispatch or Sales order with a Job, that Job will be assigned by default to the Sales invoice.
To display a list of all valid Jobs, click on the button or press the QuickList key.
Reference: Read-only
Information is under review for a new version and will be updated soon.
Reference: Account Field Type, QuickList
Information is under review for a new version and will be updated soon.
Reference: Account Field Type, QuickList
Information is under review for a new version and will be updated soon.
Reference: Account Field Type, QuickList
Information is under review for a new version and will be updated soon.
Reference: Menu
This menu option automatically displays the Receipt form and creates a new receipt record for the Customer and Sales invoice.
The displayed Receipt form is left in add mode so that you can manually make any changes before updating, or you can cancel the Receipt and not update it at all.
Reference: Menu
Information is under review for a new version and will be updated soon.
Reference: Menu
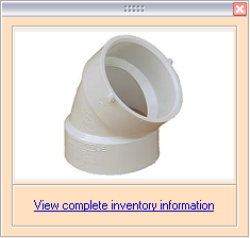
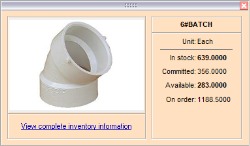
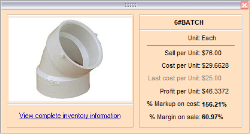
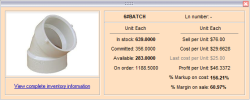
This window will show additional information on the selected stock item based on various settings that can be applied.
The window can display only within the boundaries of the form with which it was opened in, as the relationship is dependant on that form. The following information can be displayed, based on user preferences and system settings:
- Image
- Shortcut to complete Inventory information
- Quantity information
- Costing information
Preferences
Users
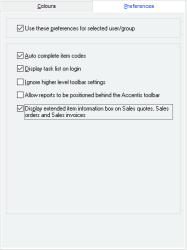
There is a User permission that controls whether or not the Extended item information window will display for each user or group of users.
To configure this setting, go to User > User preferences > Preferences tab > Select user/group > Tick "Use these preferences for selected User / group" > Tick "Display Extended item information window on Sales quotes, Sales orders and Sales invoices.
System
There are two options that control the information that can be displayed within this email. These are:
- Display costing information on the extended item information window
- Display quantity information on the extended item information window
You can access these settings by going to System > Preferences > Accounts receivable tab.
Field definitions
Image
If an item has not had an image saved against it, the image square will display as an invalid image. Any image that is linked will be resized and displayed within the window.
Quantity information
This data selection will display:
- Unit
- In stock
- Committed
- Available
- On order
Costing information
This data selection will display:
- Unit
- Sell per unit
- Cost per unit
- Last cost per unit
- Profit per unit
- % Markup on cost
- % Margin on sale
All information
When all information has been selected to display, it will show in an elongated window with Quantity and Costing data side by side.
Reference: Menu
Information is under review for a new version and will be updated soon.
Reference: Menu
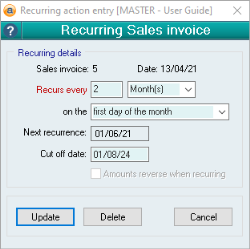
This menu item allows you to set the Sales invoice to recur at specified periods, such as if the invoice represents a monthly subscription charge.
Selecting this option will open the Recurring Sales invoice form shown below and allows you to enter the following details.
Reference: Select from list
This option is only available for the Recurring Journal Entry form.
This option allows you to select one of two Journal entry types:
- Normal: This option means that the Recurring Journal Entry will function the same as all other recurring actions.
- Accrual: This option means that the journal will become a reversing journal that will happen once only, will recur on the 1st day of the next month, and will reverse the amounts of the original journal.
Reference: Read only
This field is read-only and displays the type and code to which the recurring action refers. The four types of recurring actions are:
- Journal entry: This recurring action is triggered from the Special menu of the Manual journal entries form and will display the Journal entry #.
- Sales invoice: This recurring action is triggered from the Special menu of the Sales invoice form and will display the Sales Invoice #.
- Supplier invoice: This recurring action is triggered from the Special menu of the Supplier invoice form and will display the Supplier Invoice #.
- Payment: This recurring action is triggered from the Special menu of the Payment form and will display the Payment #.
Reference: Read only
This field is read-only and displays Date for the selected record referenced in the Recurring info.
Reference: Number, Select from list
This field allows you to specify the number and unit by which you want the action to recur. The quantity field can be filled with any number up to 4 digits long. The unit field allows you to choose one of:
- Day(s)
- Month(s)
- Year(s)
Reference: Select from list
This field allows you to choose when in the given month the action will recur. This field is only available when Month(s) or Year(s) have been selected in the Recurs every... field. The options are:
- Day specified
- First day of the month
- First weekday of the month
- Last day of the month
- Last weekday of the month
Reference: Read only
This field is a read-only date displaying when the recurring action will next occur, as calculated by the selections in the Recurs every... and ...on the... fields.
Reference: Date
This field allows you to specify when you would like the recurring action to cease.
Note: If you input a date into this field that occurs before the Next recurrence date, this action will not recur.
Reference: Yes/No
This option is only available for the Recurring Journal Entry form.
This option allows you to specify that the amounts on the recurring journal entry will reverse the current journal entry. This is selected by default when the recurring entry type is set to Accrual.
Reference: Button
There are three buttons at the bottom of the Recurring action form, which are:
- Update: This will update your changes to the recurring action (either for a new entry or on an existing one).
- Delete: This will delete the existing recurring action.
- Cancel: This will cancel your changes.
Reference: Menu
Information is under review for a new version and will be updated soon.
Last edit 10/01/22
